Ulfgar Utility

Let’s talk about Ulfgar Ironfist.

This little figure packs a mean punch.  Ulfgar-stats
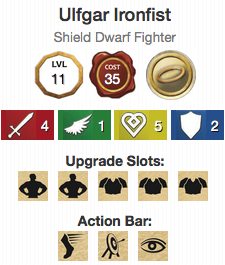
Ulfgar has pretty good stats and is the first Creature with three Equipment slots in the game, which gives him a lot more options when gearing up.

However, before picking out gear, we should take a look at Ulfgar’s unique ability:

Whenever Ulfgar attacks a target at Range 1, he may convert 1 of his Hit results into 1 Critical Hit result.

That’s very nice, especially when you realize it’s on ranged or melee attacks.What many may not realize is the variety of builds Ulfgar has available. You can build on his ability by stacking his melee power, or mix and match them for many options, or surprise targets with several ranged options.

Unbridled Ulfgar.

Power Attack, Focused, Frost Brand, Guenhwyvar, and Sacred Plate Mail.
At range 1, he can roll 6 dice with melee attacks, converting 2 Hits into Crits, can make an extra attack with Guenhwyvar, also converting 1 Hit to a Crit at range 1, and converts 1 Crit to a Hit when defending against Primary Weapons.  Focused lets him change his facing, once, if someone moves through him.

Utility Uflgar.

Holy Warhammer, Power Attack, Taulmaril, Dwarven Precision, and Elixir of Healing.
Is the enemy close and low?  Hammertime!  Use Target + Holy Warhammer + Power Attack and Ulfgar has a bonus attack die and 2 Hit to Crit conversions.
Is the enemy at range? Use Concentrate + Taulmaril + Dwarven Precision for heavy critical damage. Taulmaril converts 1 Hit to a Crit, being at Range 1 would convert another, and the Concentrate token plus Dwarven Precision converts all your concentrates to critical hits.
Took some damage? Take a swig from your Elixir of Healing.

Unconventional Ulfgar.

Point Blank Shot, Dwarven Precision, Flying Greatsword, Hammer of Thunderbolts, and Taulmaril, and Ring of the Ram.
At range 1, the ranged attacks get a bonus attack die, convert a Hit to Critical Hit (2 if using Taulmaril), and can be used in combination with Concentrate and Dwarven Precision. The Hammer of Thunderbolts gets a follow-up attack against the same Creature and everyone in range 1 from that Creature (and more Hit to Crit conversions if those new targets are in range 1 from Ulfgar).
While making those ranged attacks, the Flying Greatsword can do some damage, still converting a Hit to a Crit at Range 1.

Oops, I should have realized you cannot equip a two-handed weapon AND a one-handed weapon at the same time (that’s really unconventional), so let’s replace the Hammer with the Ring of the Ram, which will let him ground creatures to make them easier for his allies to hit.

Still Upright Ulfgar.

Power Attack, Twinkle and Icingdeath, Sacred Plate Mail, Stone Bracers, and a Giant Toad make Ulfgar fast and hard to put down. Twinkle and Icingdeath let him penetrate armor, plus add a defense die, Stone Bracers gives his bonus defense against area attacks, and Sacred Plate Mail converts a Crit to a Hit. Finally, the Giant Toad lets him quickly get to his targets!

There are a lot more options and with Wave 7’s Earth Cult Warrior, Wave 8’s Air Cult Warrior, Wave 9’s Fire Cult Warrior, Wave 10’s Goblin Fighter Troop, and more humanoid Creature’s heading our way, the options will only keep growing.

Have you tried Ulfgar out yet?

Let’s All Do the Bump

(How can you go wrong with a shameless MC Hammer reference to start a post?)

In Dungeons and Dragons: Attack Wing, bumping is different than in either the Star Wars: X-Wing or Star Trek: Attack Wing games.

In DNDAW, bumps do not cause you to lose actions (bolded because it is really important to remember) and, if the Creature that is currently moving is a flying Creature and the Creature they overlap (bump into) is a ground Creature, the flying Creature can choose to continue flying forward over the ground Creature.

This is explained on page 27 of the Starter Set Rulebook but, based on questions I saw over the weekend, some people are still a little confused about how it works.

So here goes:

If your movement ends with your base overlapping the base of another Creature, what happens depends on what kind of Creature you are and what kind of Creature you overlap.

  • If you are a ground Creature, you move your Creature back along the maneuver template until your base no longer overlaps any other Creature’s base.
  • If you are a flying Creature and your base overlaps with another flying Creature’s base (that has not landed) you move your Creature back along the maneuver template until your base no longer overlaps any other Creature’s base.
  • If you are a flying Creature and your base overlaps with a ground Creature’s base (or the base of a flying Creature that has landed) you have two choices.
    • You may choose to move your Creature back along the maneuver template until your base no longer overlaps any other Creatures.
    • You may also choose to continue, in a straight path, until you clear the ground (or landed flying) Creature’s base. If this causes you to overlap your base with a flying Creature’s base, you will have to move your Creature back along the maneuver template until your base no longer overlaps any other Creatures, but if this causes your base to overlap another ground Creature’s base, you will continue forward. You will continue forward until:
      • you find a spot your Creature fits in (with no base overlapping)
      • you bump into a flying Creature (which would require you to move all the way back until you fit)
      • you reach the edge of the game area, which would be considered Fleeing the Battlefield (see page 26 of the rulebook).

I have seen a dragon fly over an entire Troop and the frost giant behind them, moving across almost half the play area.

Once you’ve chosen to have your flying Creature fly over the ground (or grounded) Creature, you have committed to that movement. It is easy to eliminate your own Creature if you are not careful.

If your flying Creature was executing a wingover/roundable/u-turn maneuver when they bump a ground Creature, they still get to complete it (to turn around) regardless of if they stop in front of the ground Creature or fly over it.

Just to be clear, when you’re using a straight maneuver to fly over a ground creature you overlapped, you move just far enough to clear the overlapped creature. You would not grab the Straight 6 and go zooming off!

You can use this to sneakily move your Flying Creatures across the map by having them fly over your own landed/grounded Creatures!

Troops have special rules for if the point man fits  but other soldiers do not fit. See the “Pressed Soldiers section on page 31 in the rulebook for more on this. The very short version is that it is bad to have pressed soldiers in a Troop.

Overrun Checks will be the subject of a future post and should not be mistaken for bumping. See page 26 of the rulebook for the Overrun Check rules.

TL:DR version: Flying Creatures can fly over/past ground or landed Creatures, continuing forward using a Straight template until they either A) no longer overlap another creature’s base, B) bump into a Flying Creature, or C) are eliminated from leaving the play area.

See you in the skies!

Landing and Pivoting

Now that the game has finally landed in stores, let’s talk about landing in the game!

“I’m a dragon! The sky is my domain! Why would I ever land?”

That’s a valid point, oh great and wise dragon, but there are a few cases where you might want to land.

You’re out of room to maneuver.

The most obvious use of landing is when, after you’ve moved, you realize you are getting closer to the edge than you like. You can elect to land, which means you’ll be able to pivot on the following turn, and you’ll be able to avoid an embarrassing death.

Pivoting is fairly powerful, especially if the creature pivoting is a higher level, as it lets you choose your facing after lower level creatures have moved.

However, it also prevents you from taking an action that turn and makes you easier to hit, so if your opponent(s) are paying attention, they can position themselves to they’ll be able to take advantage of the bonus attack die they get against you.

For example, if I know your only real choice is to pivot on this turn, I might decide it’s the right time to use my Haste upgrade, because Haste’s -1 attack die will be cancelled out by the +1 I gain because you pivoted, allowing me two attacks at full value.

Alternatively, if I have a Frost Giant out, I could use the Poison Blade or Frost Battle Axe to gain a +1 attack die in addition to the +1 attack die I will get for attacking a creature that just pivoted, for a total roll of 6 attack dice.

So while pivoting might be a great move, as it allows you to choose your facing, it can hurt if your opponent can maneuver two or three creatures into attack range.

You want to force your opponent to make a choice.

Your opponent has positioned Balagos so that both of your dragons are going to be in range of his Fire Breath, letting him roll a five die attack, that penetrates armor, against each of your dragons (six if you’ve wounded Balagos!).

If you land one of your dragons, you will force your opponent to have to choose which of your dragons to hit, as most area affect upgrades are either ground or air, but not both. By landing, you immediately cause Balagos to lose five (or six) attack dice (he can only attack one of you, not both), and you force the opponent to have to decide which of your dragons to attack.

You’ll want to try to make sure the dragon you’re landing will still get an attack. If Balagos is flying and your dragon has landed, you won’t be able to attack Balagos with a melee attack.

You want to dodge an attack.

If your opponents attackers do not have any ready ranged attacks, landing may prevent them from attacking you at all! They may have forgotten to swoop and might not be able to reach you if you land.

Ok, you’ve landed, what now?

Don’t forget to switch to the ground maneuver dial!


See you in the skies!

Swooping

Hello folks!

The game will be out …

soon
While we’re waiting, I thought I’d talk to you about some of the mistakes you’re likely to make the first few times you play. This is part one of a series; if people seem to enjoy the article, I’ll write some more (about landing, pivoting, spending concentrate and target to cast spells, and more).

You’re going to forget to swoop.

This probably won’t matter much with the starter set, but once you play with ground troops, it will be much more important.

Let’s look at the rules for swooping.

When can you swoop? The choice to swoop, stop swooping, land, and take off all happen during the Change Altitude step of the Activation Phase (page 12-13 of the rulebook). Basically, after a flying creature moves, they may decide to land, swoop, or if on the ground, to take off. You place the appropriate token down next to the creature.

Added: If you do not choose to change your altitude at the end of your movement, you remain at the same altitude. If you were grounded, swooping, or flying, you remain grounded. swooping, or flying.

When should you swoop?

If you have a flying creature and you want to make a melee attack against a non-flying creature, be that a bite, tail swipe, touch attack (hello Lord Max!), you need to be swooping or on the ground to do so.

So if Balagos wants to chew on a ballista, he will have to land or be swooping in order to reach him.

Why not always swoop?

Swooping not only puts you in melee range so you can attack ground units, it lets them, if they have a melee attack, attack you! In many cases, there may not be a significant difference in their attacks, but in some cases, they may have Upgrades that will make their melee attacks more effective.

For example, Jarl Horn has a 4 die ranged and melee attack, but if he is also equipping the Frost Axe, his melee attacks will get +1 die, so you may not want to swoop or land.

If all your enemies have a ranged attack or are also flying, it may make sense to declare you are swooping early, as it means you won’t forget to swoop when you need to later.

That’s all for this post.

See you in the skies!

(Edit: added additional information about altitude changes)